Setting up your SAP environment (Document Service)
Credentials
Before you can start using the Document Service API, you need a client, a user and a password.
For testing you can use:
https://rz3.aeb.de/demo1docs/
Mandant(client): APITEST
User: API_TEST
PW: API_TEST2021
Generate Enterprise Services from WSDL
If you like to implement against the Document Service - API from S/4Hana or SAP ERP 6.0 you have to generate one or more Enterprise services. You have to generate an Enterprise Services for each WSDL you like to use.
First create a package from SE80. Then right click on the package choose Create -> Enterprise Services.
Then a wizard will be shown.

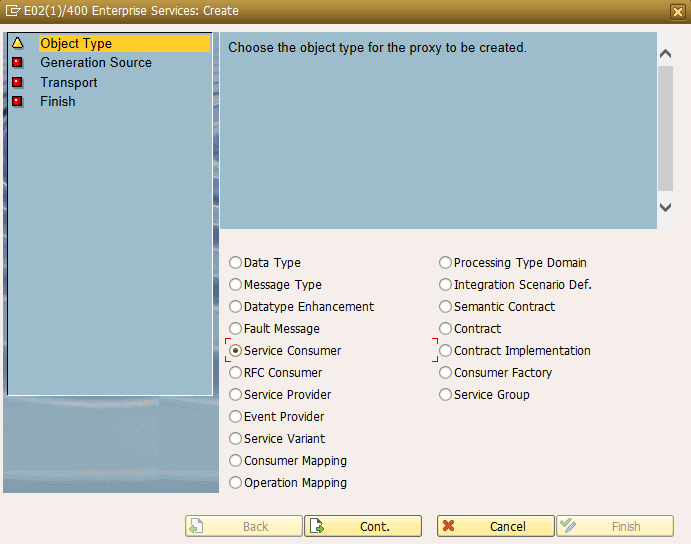
In the wizard choose Service Consumer and click on continue. Then you have to choose where the source of your service is located. Choose External WSDL/Schema. Then you have to choose the data source. Here you have to choose URL. Go on with continue.
The URL you have to set is https://rz3.aeb.de/test2docs/servlet/bf/DocumentServiceBF?WSDL.
It's recommended to download the WSDL first and do a local upload from file. Please also keep in mind to download the corresponding XSD.
Now choose the package you have created before. Set a request and provide a Prefix if necessary and go on with continue.
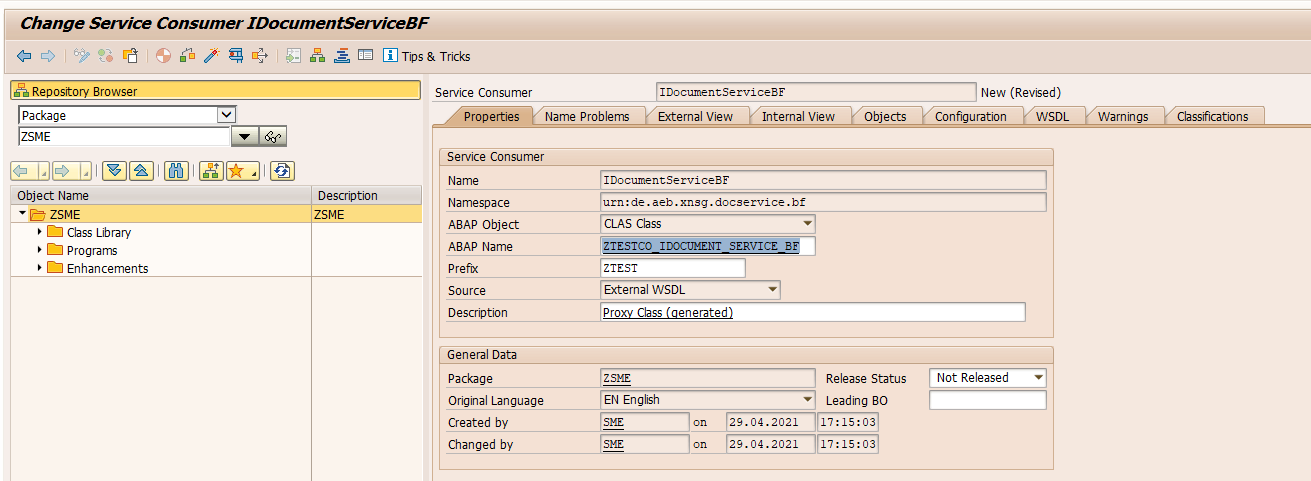
Now the Service Consumer is created. You should see something like that:

Activating Service Consumer
If that was not working please refer the the trouble shooting guide.
If there were no errors just save the Service Consumer. The next step is to activate the Service Consumer.
If you check the service consumer, it will tell you that there are recursions used and that is not allowed in this context. So we have to fix that. Go to the menu -> utilities -> Settings. In the popup go to tab "Proxy Generation and there you have to mark the checkbox "Show Untyped Mapping in Proxy Editor".
Save the settings and go back to the Service Consumer. There you have to go to the "External View" Tab. Click on the binoculars and search for "record" and activate the checkbox pattern. Then on the right side you should see some details for the element "record". Click the checkbox "Untyped Mapping" and save it.
Alternatively you can remove the recursive segments already in the XSD before it's uploaded to SAP.
Now the service consumer can be activated. This step will generate the ABAP-Structures and ABAP-Classes what you need to implement against it. The Service consumer should now be active. If there were errors refer to the trouble shooting guide.
Create an executable program
It's now possible to implement something against the API.
Create an executable program and put the following code snippet into the program.
DATA:
  document_service_bf    TYPE REF TO zco_idocument_service_bf,
  output_data            TYPE zcreate_document_response1,
  input_data             TYPE zcreate_document1,
  system_fault_exception TYPE REF TO cx_ai_system_fault,
  soap_fault_excepton    TYPE REF TO cx_ai_soap_fault.

"Instatiate BF
TRY.
    CREATE OBJECT document_service_bf EXPORTING logical_port_name = 'ZDOCUMENT_SERVICE_BF_TEST'.
  CATCH cx_ai_system_fault INTO system_fault_exception.
    WRITE 'Could not instantiate the document_bf'.
    WRITE system_fault_exception->get_text( ).
    RETURN.
ENDTRY.

"Execute BF call
TRY.
    document_service_bf->create_document( EXPORTING  input = input_data
                           IMPORTING output = output_data ).

  CATCH cx_ai_soap_fault INTO soap_fault_excepton.
    WRITE soap_fault_excepton->get_text( ).
  CATCH cx_ai_system_fault INTO system_fault_exception.
    WRITE system_fault_exception->get_text( ).
ENDTRY.
Activate the program and execute it. The report should say "could not instatiate the billingBF". And the report tells us that there is no logical port ZAEB_DOCUMENT_SERVICE for the proxy class "ZAEB_DOCSCO_IDOCUMENT_SERVICE".
The next step is to create a logical port for our proxy class.
The logical port brings the consumer service, the endpoint and the authenficiation data together.
Import certificates to STRUST
To enable a direct HTTPS connection between the SAP system and the AEB data center, you need the ‘Root-SSL’ and ‘Intermediate’ certificates issued by AEB. You can open the required certificates in the Chrome browser using the following links and save them locally as a file.
- EV Root:
https://www.digicert.com/CACerts/DigiCertHighAssuranceEVRootCA.crt - EV Intermediate:
https://www.digicert.com/CACerts/DigiCertSHA2ExtendedValidationServerCA.crt - Non-EV Root:
https://www.digicert.com/CACerts/DigiCertGlobalRootCA.crt - Non-EV Intermediate:
https://www.digicert.com/CACerts/DigiCertSHA2SecureServerCA.crt
Alternatively, you can also download the certificates from https://www.digicert.com/digicert-root-certificates.htm. Search there for the following names:
- DigiCert High Assurance EV Root CA
- DigiCert SHA2 Extendded Validation Server CA
- DigiCertGlobal Root CA
- DigiCert SHA2 Secure Server CA
Proceed as follows to import the certificates into the SAP system:
- To install the certificates, start the transaction STRUST.
- Double-click on SSL CLIENT (default). For setup via the SOAMANAGER, the certificates must also be loaded into the SSL CLIENT (anonymous).
- In the Certificate field group, click the Import certificate button.
- In the window that opens, select binary for the File format option.
- Select the appropriate file with the certificate for import.
- Next, click Add to certificate list.
- Go to the PSE menu and select Distribute All.
The certificate is now distributed and installed on all application servers. - To update the imported certificates in the ICM, start the transaction SMICM, go to the Administration menu, and select ICM – Exit Soft – Global.
Create a logical port
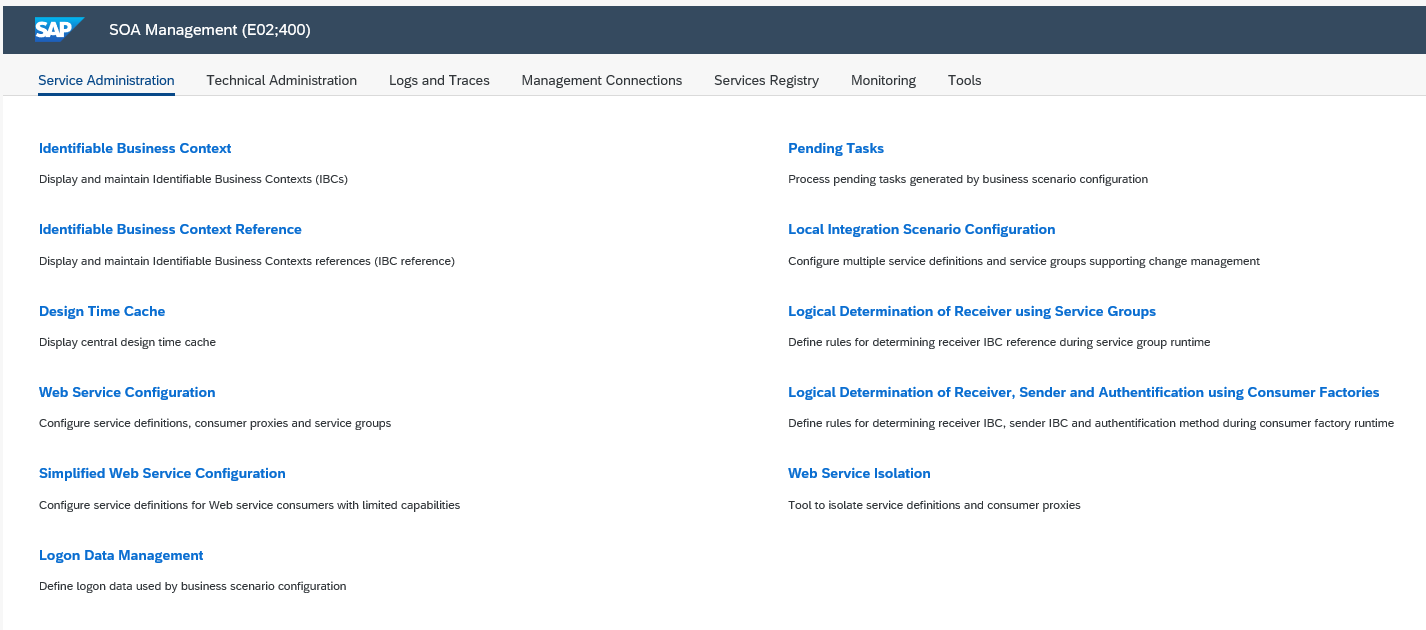
Start the transaction SOAMANAGER. The SOAMANAGER will be started in an external browser window. You should like see the following.

Go to Web Service Configuration and search for your proxy class ZAEB_DOCSCO_IDOCUMENT_SERVICE.
Configuring a logical port with SOMANAGER (SAP NetWeaver Release 7.1 and higher)
- Start the transaction SOAMANAGER.
- Click the Web service configuration link.
- Select Object type as the search criterion and enter the search term Consumer proxy.
- Select Object name as the second search criterion and enter the search term IDocumentServiceBF.
Click Search. In the list of search results, the consumer proxy with the internal name ZAEB_DOCSCO_IDOCUMENT_SERVICE and the name IDocumentServiceBF is displayed. - In the entry, click on the link in the Internal name column.
- In the consumer proxy details displayed below, select the Configurations sheet and click Create – Manual configuration.
- Enter a name of your choice for the logical port and its description, then click the Next.
- In the Consumer security sheet, select the User ID and password option for an HTTPS connection, i.e. for all connections to the AEB data center. Specify the user ID in the format of
<user in the target system>@<client of the target system>and the password matching the user.
When you are finished, click Next. - In the HTTP settings step, enter the following values:
Field name | Value | Explanation |
|---|---|---|
Log | HTTPS | |
Host | rz3.aeb.de | Server name of target system |
Port | 443 | Port under which the target system can be accessed |
Path | /test2docs/servlet/bf/DocumentServiceBF | Ask your AEB representative if you do not know the path name of the target system. |
Name of the proxy computer / etc. | Name of the proxy server | If a proxy must be used, enter the relevant access data for the proxy here and in the other fields |
Execute local call | No local system call | |
Transport binding type | SOAP 1.1 | |
Max. waiting time WS consumer | 0 | |
Optimized XML transfer | none | |
Compressing the HTTP message | Active | |
Compressing the response | True |
When you are finished, click Next. In the SOAP log step, enter the following values:
Field name | Value |
|---|---|
Message ID log: | Suppress ID transfer |
Scope of data transfer | Minimal data transfer |
Transfer log | Transfer via HTTP header |
Click Finished to save the configuration of the logical port. The logical port should be displayed with the Active status in the list of logical ports for the consumer proxy. Otherwise, activate the port manually using the Activate button.
Updated 6 months ago