GLS (Germany): Account Configuration
For general information about how to configure a carrier in Carrier Connect, refer to our User Guide (German version).
To create a new GLS account in Carrier Connect, open GLS in Master data > Carrier configurations. In the tab Accounts click on New.
GLS account

| Number | Field | Comment |
|---|---|---|
| 1 | Shipper | The address of the shipper |
| 2 | Carrier address | The address of the carrier (depot) |
| 3 | Condition | See our user guide |
| 4 | Single pkg. handling | See Single Package Handling |
| 5 | Customer no. | Assigned by the carrier |
| 6 | EDI transmission | Set to Send and log |
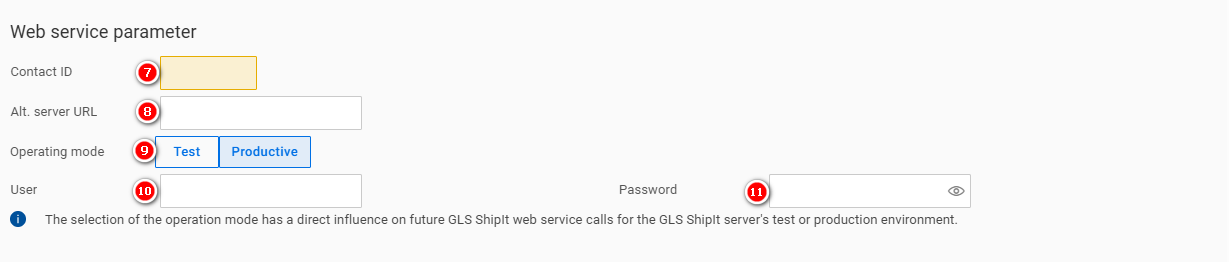
| 7 | Contact ID | Assigned by the carrier |
| 8 | Alt. server URL | Assigned by the carrier. The URL used for the GLS webservice. It looks like this: https://shipit-wbm-de01.gls-group.eu:8443/backend/ShipmentProcessingService/ShipmentProcessingPortType |
| 9 | Operating mode | Choose Test, if you are in the test environment. Choose Productive, if you are in the productive environment. |
| 10 | User | Assigned by the carrier |
| 11 | Password | Assigned by the carrier |
Single Package Handling

- The package number and the total number of packages are usually printed on the package label, e.g. 1 OF 2 for the first package, 2 OF 2 for the second package. Exception is the UPS service "Standard Package". With this service, 1 OF 1 is always printed on each package label, regardless of how many packages there are in total.
- If single package handling is activated, 1 OF , 2 OF , etc. will be printed on the label for all services except "UPS Standard Package".
Updated 7 months ago
Did this page help you?